
15: Generative Graphics
Controlling Text-to-Image Diffusion by Orthogonal Finetuning (Jun 2023, added 6/19/23)
(link)
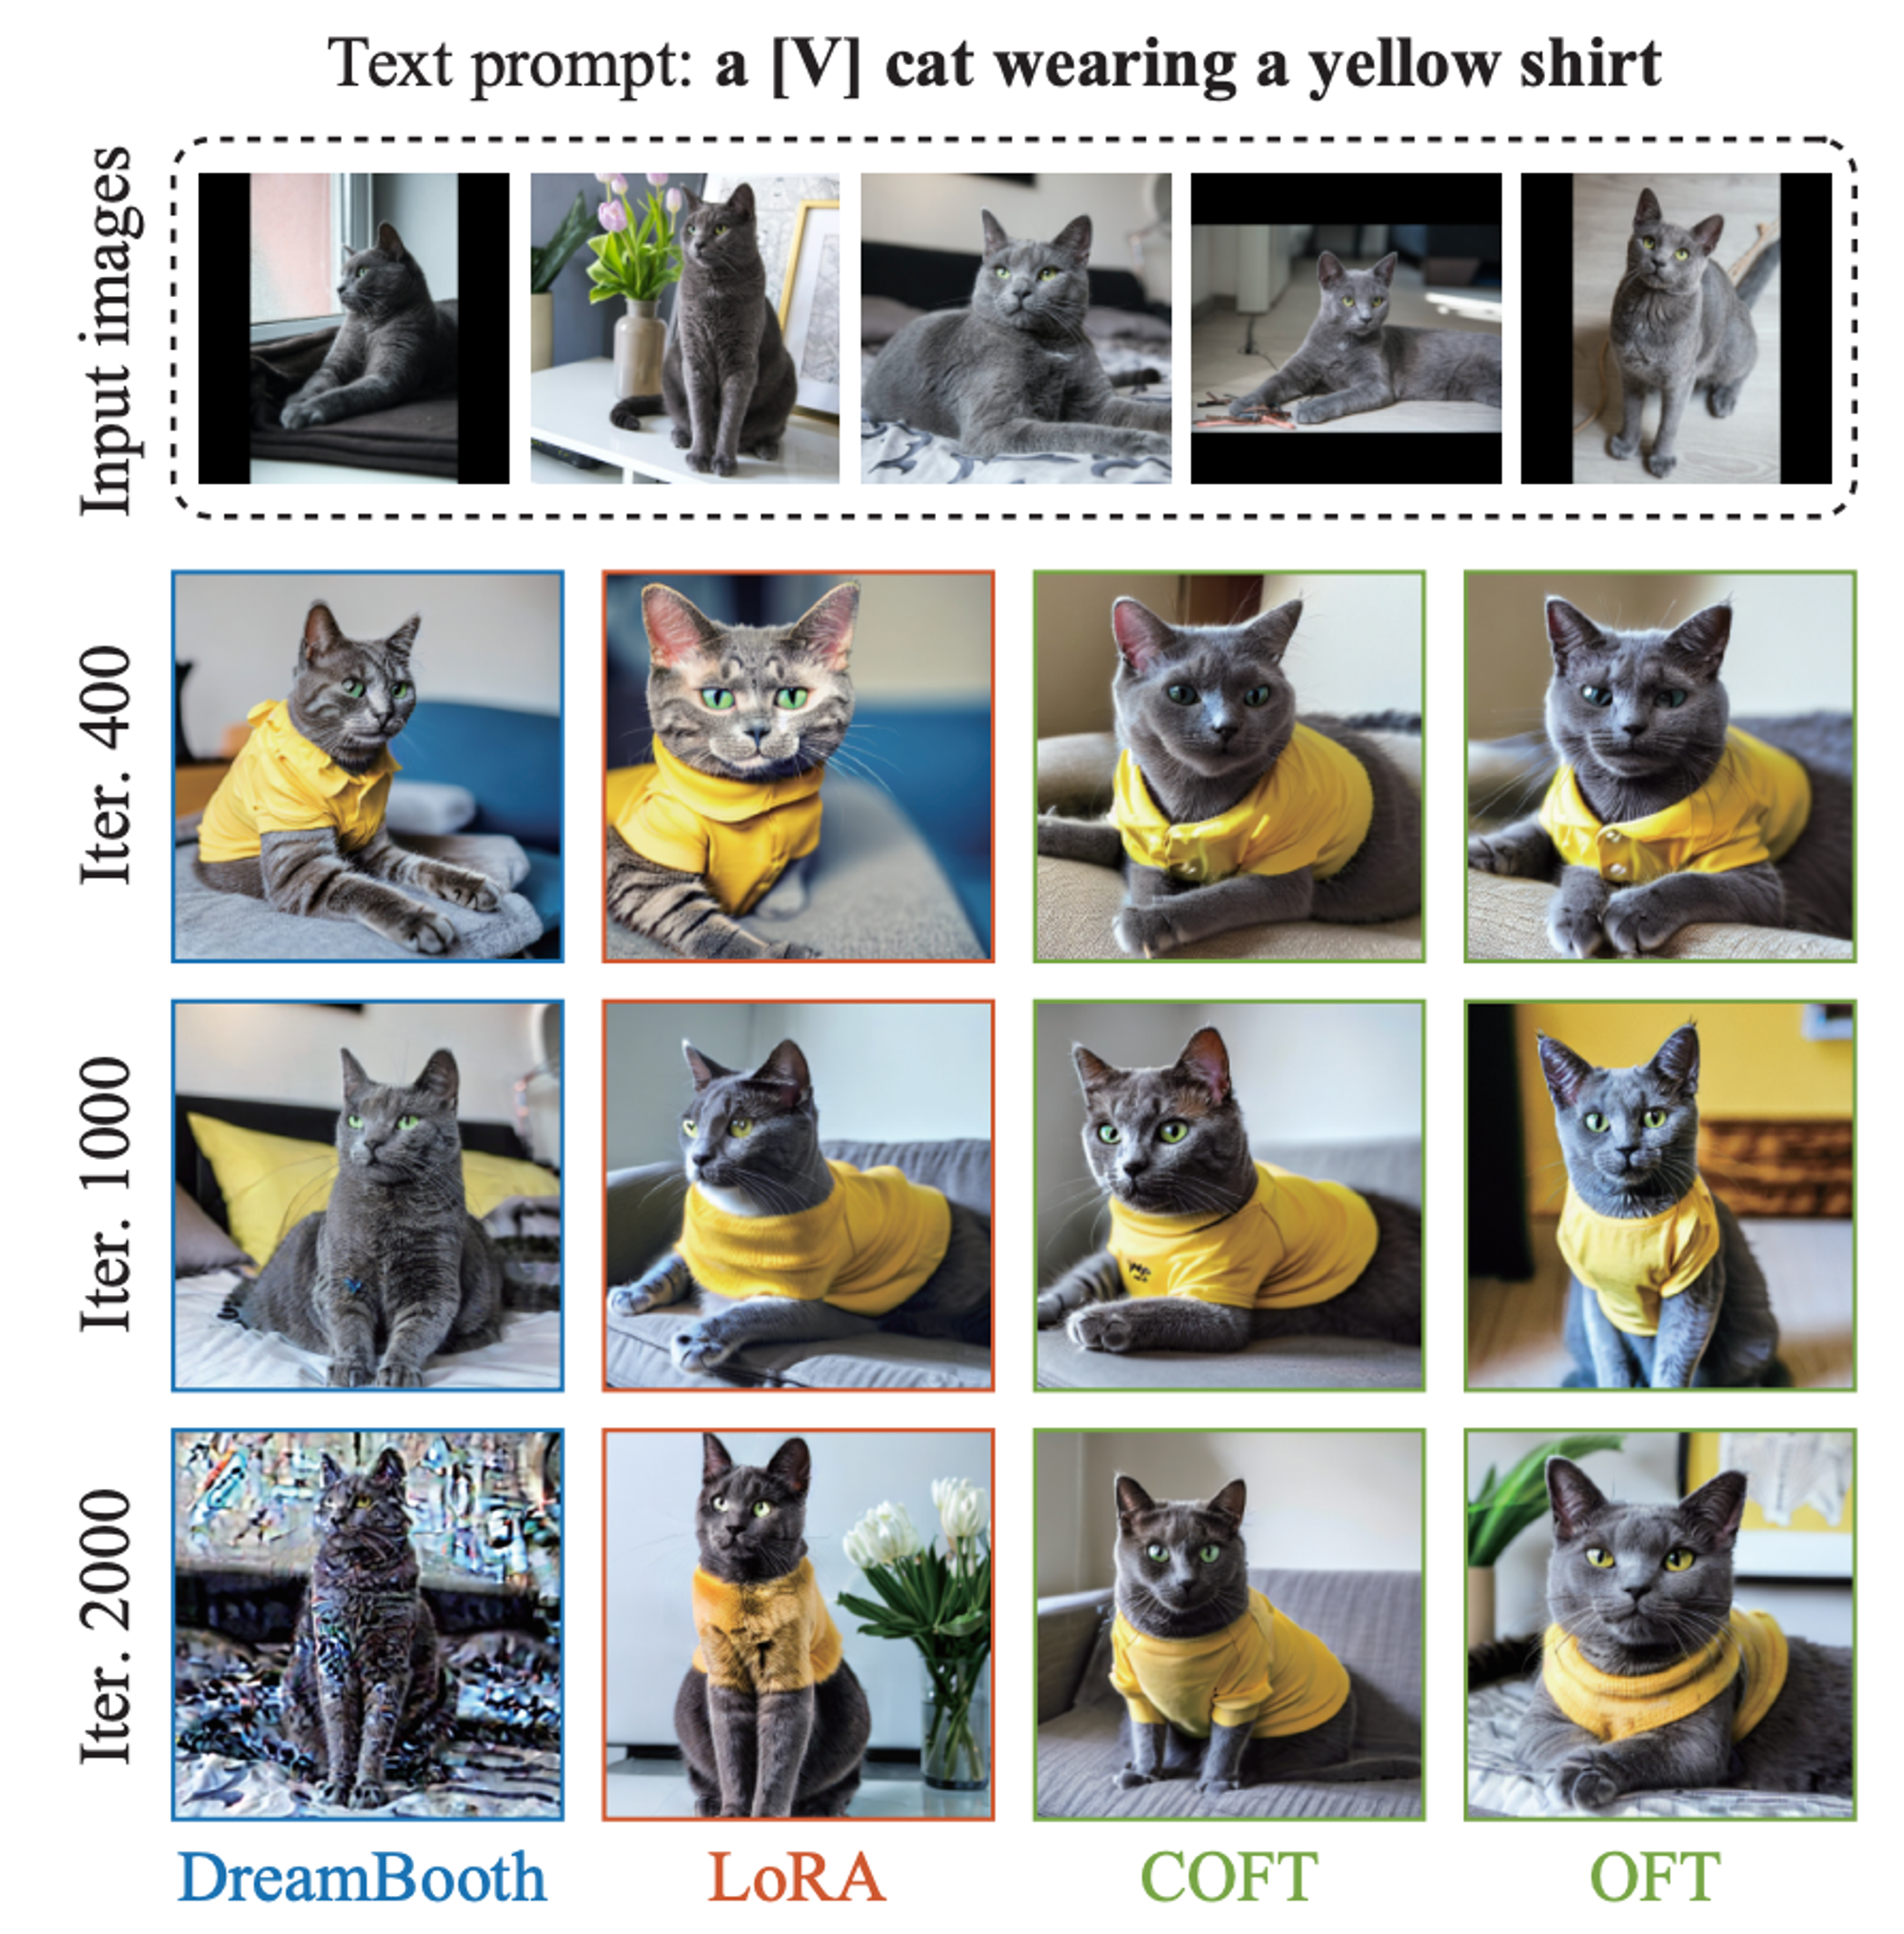
The paper proposes a new algorithm for diffusion model fine-tuning that we will probably soon see implemented in standard diffusion models. In diffusion models, we train a base model that is good at turning a text prompt into an image. But then we want to fine-tune it: either for subject-driven generation (e.g., your face in every image), or for controllable generation (e.g., give it a shape or a depth map, and it will use those in the image). The problem: the more you fine-tune, the more you lose the original model’s image generation capabilities. And the problem is, under today’s image fine-tuning algorithms (Dreambooth or ControlNet are famous), it’s really quite random how that happens. The paper proposes a new algorithm that seems to be much better at fine-tuning a diffusion model - while still preserving its image generation capabilities.
How does it do that? Here is the intuition:
Obviously, the base model’s image generation capabilities (that we achieved by training it with tons of images and text pairs) are encoded in its neuron weights. So when we fine-tune the model, it seems intuitive that we want the new model to not be “too far away” from the old model - i.e., a neuron in the fine-tuned (new) model should be “close” (in Euclidean distance) to the same neuron in the base (old) model. This is why we do fine-tuning with small learning rates: if you move the neurons too much, intuitively the base model’s capabilities will get diminished.
However, here is a weird thing! Look at the simplest possible image autoencoder: it’s basically a matrix that takes an incoming vector (the image, a list of pixels) and multiplies it with its matrix weights (w in the equations below). Or rather, it’s several matrixes in a row, but whatever. This is a linear transformation, and as such we can split it up (at no loss of generality whatsoever) into an “angular” rotation, and a “magnitude” (a boost). Weirdly, it turns out that you can completely throw away the magnitude part of this, and still basically reconstruct the original image. In the image below, (a) is the full image reconstruction process (you multiply the image vector x with the weights), (b) only uses the magnitude of the weights w, and (c) only uses the angle of the weights w. Obviously, (a) reconstructs the image, but so does (c), while (b) completely fails.

This is where the paper's main idea comes in: if the “angle” represented by neurons in the model weights matters, then let’s use a fine-tuning algorithm that doesn’t just awkwardly use small learning steps - but rather, use one that actively preserves these “angles”. That means preserving the pairwise (between two neurons in the old and new model) hyperspherical similarity. That is provably preserved if we apply the same orthogonal transformation for all neurons. So that’s the new fine-tuning algorithm: Orthogonal Finetuning (OFT), which adapts large text-to-image diffusion models to a downstream task without changing its hyperspherical energy. The central idea is to learn a layer-shared orthogonal transformation for neurons such that their pairwise angles are preserved.
The algorithm works better than Dreambooth and Lora:
Basic Developments in Generative Graphics (Apr 2023, added 5/1/23)
At a high level, this is what happened:
Stable Diffusion showed that you get the best results if you generate graphics at the pixel level, but in “latent space” - i.e., you run pixel-by-pixel data into an abstract space, you add noise in that space, and you use a neural network to subtract that noise from the image step by step, so that a clean image eventually emerges. This is the algorithm underlying Stable Diffusion (open-source, fully available in Transformers on Hugging Face, for example), Midjourney, Dall-e 2 and others.
The input into a latent diffusion algorithm comes from a text prompt that gets run through a text encoder, i.e., maps the text into some abstract representation that you can jam into the de-noising process.
The input can also come in other ways, like an image, and the process works very similarly - you just give the de-noising process a different starting point (an image and not just a text prompt).
And then it’s an obvious extension to allow things like in- and out-painting, where you give part of an image as a start, and the algorithm fills in the rest.
Dreambooth then showed how you can take the weights in the neural network that is so smart at de-noising the abstract image (see above), and it fine-tuned those weights. That allows Stable Diffusion to be fine-tuned towards a particular style, or subject, or whatever.
You can also fine-tune the text encoder, or even just find a very particular “text” (or rather, abstract representation of it), that always elicits a particular style from the generation process.
ControlNet then further allowed for guiding and controlling the image generation process. The idea is that you train the network on accepting an additional input and train it to pick up on the information in that process. For example, ControlNet comes with pre-trained weights that can accept things like pose data (i.e., you run a pose detector algorithm on an image which extracts the “skeleton” of a person in it, and then that skeleton will be used to generate a new character in the new image with the same pose).
This basic flow (de-noising diffusion => fine-tuning => controlling) of a diffusion process could be applied in all kinds of domains, such as audio. There is debate as to which domains this works in best.
Stable Diffusion Samplers: A Comprehensive Guide (Mar 2023)
(link)
Discusses the various samplers you can use for diffusion models. In diffusion, you generate a random image. A noise prediction model estimates the noise of the image, and the predicted noise is subtracted from the image. This process is repeated many times, and you get a clean image. The denoising process is called sampling because a new sample image is created in each step. The noise schedule controls the noise level at each sampling step. At each step, the sampler’s job is to produce an image with a noise level matching the noise schedule.
All samplers with “a” are ancestral samplers: adds noise to the image at each sampling step. They are stochastic samplers because the sampling outcome has some randomness to it. The drawback of using an ancestral sampler is that the image would not converge.
The samplers with the label “Karras” use the noise schedule recommended in the Karras article. The noise step sizes are smaller near the end. They found that this improves the quality of images.
(link)
DDIM (Denoising Diffusion Implicit Model) and PLMS (Pseudo Linear Multi-Step method) were the samplers shipped with the original Stable Diffusion v1. DDIM is one of the first samplers designed for diffusion models. PLMS is a newer and faster alternative to DDIM. They are generally seen as outdated and not widely used anymore.
DPM (Diffusion probabilistic model solver) and DPM++ are new samplers designed for diffusion models released in 2022. They represent a family of solvers of similar architecture.
DPM and DPM2 are similar except for DPM2 being second order (More accurate but slower).
DPM++ is an improvement over DPM.
DPM adaptive adjusts the step size adaptively. It can be slow since it doesn’t guarantee finishing within the number of sampling steps.
UniPC (Unified Predictor-Corrector) is a new sampler released in 2023. Inspired by the predictor-corrector method in ODE solvers, it can achieve high-quality image generation in 5-10 steps.
k-diffusion refers to Katherine Crowson’s k-diffusion GitHub repository and the samplers associated with it.
How to pick the right sampler: do that based on convergence and quality.
DPM++ SDE and DPM++ SDE Karras performed the best in this quality test.
If you want to use something fast, converging, new, and with decent quality, excellent choices are DPM++ 2M Karras with 20 – 30 steps
UniPC with 20-30 steps.
If you want good quality images and don’t care about convergence, good choices are
DPM++ SDE Karras with 8-12 steps (Note: This is a slower sampler)
DDIM with 10-15 steps.
Avoid using any ancestral samplers if you prefer stable, reproducible images.
Euler and Heun are fine choices if you prefer something simple. Reduce the number of steps for Heun to save time.
Where To Run Stable Diffusion
First, here are the options for fine-tuning Stable Diffusion using Dreambooth:
Code on Hugging Face here (requires deploying on a machine or in Google Colab)
Fully functioning Space on Hugging face here (need to duplicate the space and attach it to a GPU machine)
Second, you can then immediately deploy the model as txt2img, there are various Spaces on HF that do that. However, there isn’t any good img2img Space.
Better to create a simple Google Colab notebook, like mine here
The code is straightforward, you just need to point to your model on HF and run the code from here (again pointing to your HF model)
Recipe for doing this on Replicate (which also offers an API for inference) here:
Set Replicate token (get it from your website profile):
export REPLICATE_API_TOKEN=[token goes here]
Create zip file of all training images (stored in folder /data):
zip -r data.zip data
Upload zip file:
RESPONSE=$(curl -X POST -H "Authorization: Token $REPLICATE_API_TOKEN" **https://dreambooth-api-experimental.replicate.com/v1/upload/data.zip**)
curl -X PUT -H "Content-Type: application/zip" --upload-file data.zip "$(jq -r ".upload_url" <<< "$RESPONSE")"
SERVING_URL=$(jq -r ".serving_url" <<< $RESPONSE)
Do the same uploading with the “class images” zip file - these are images that are of a similar class, but are anti-examples for what should appear in the model’s output.
Start the training job. Also, here are all the trainer versions. Those can be important to look at because when you click through to each trainer, it shows all the model parameters, and you can attach any of those in the call here:
curl -X POST \
-H "Authorization: Token $REPLICATE_API_TOKEN" \
-H "Content-Type: application/json" \
-d '{
"input": {
"instance_prompt": "a profile picture of an oscvtr doctor",
"class_prompt": "a profile picture of a doctor",
"instance_data": "'"$SERVING_URL"'",
"class_data": "'"$CLASS_URL"'",
"num_class_images": 21,
"max_train_steps": 2500,
"train_text_encoder": "true",
"scale_lr": "true",
"lr_scheduler": "linear",
"lr_warmup_steps": 0
},
"model": "marioschlosser/oscvtr",
"trainer_version": "cd3f925f7ab21afaef7d45224790eedbb837eeac40d22e8fefe015489ab644aa",
"webhook_completed": "https://example.com/dreambooth-webhook"
}' \
https://dreambooth-api-experimental.replicate.com/v1/trainings
This call returns "id":"oxino2bvkvg4fcbrmvnjbjr224" which is the training job id.
You can check in on the running training job:
curl -H "Authorization: Token $REPLICATE_API_TOKEN" \
https://dreambooth-api-experimental.replicate.com/v1/trainings/[put training id here]
Important tips for training:
The images all need to be jpeg, and all sized to 512x512.
Use birme.net to do that in batch.
Training on class images helps.
Input image for img2img needs to also be 512x512, otherwise it won’t converge
ControlNet in Stable Diffusion
This is a clever extension of Stable Diffusion: it uses an additional input into Stable Diffusion to further condition its output. It is fully supported in Hugging Face, here is the implementation. It can also be used with DreamBooth, so you can first fine-tune Stable Diffusion on a particular style or object, and then you can run ControlNet to further condition the output. ControlNet can condition the output essentially on any image-type input - so whatever kind of systematic, two-dimensional image data you can derive from the input image, you can pass to the output image. For example, you use a pose detector on input image (1), then you get the poses (2), and then you run Stable Diffusion conditioned on those poses and you get (3) (simply through txt2img, i.e., this just comes from the prompt “super-hero character, best quality, extremely detailed”):
ControlNet comes out of the box with several conditionings. Each of these has to get trained, but you can also train your own.
Canny edge, soft edge or M-LSD line detection (monochrome image with white edges on black background)
Depth estimation (grayscale image with black representing deep areas and white representing shallow areas)
Normal map (this is a normal-mapped image)
OpenPose (an OpenPose bone image)
Human scribbles (hand-drawn monochrome image with white outlines on a black background)
Semantic segmentation (an ADE20K's segmentation protocol image)